1 Basic configurations in OBS
Now let’s go through the settings sections of OBS Studio. That’s how you will know where to find what you are looking for. In addition, we will also explain which adjustments have to be done to optimize your performance on Twitch. You can find all the menus discussed below at File->Settings.
General
Here you can make some useful adjustments, such as setting a security question when starting a broadcast. That way, you can prevent your live stream on Twitch from being started too early by accidentally clicking on it. You can also set whether your stream should be recorded directly and how the sources should be positioned by default.
Feel free to try out the configurations and figure out what you like best for your Twitch broadcast. In the beginning, however, not much has to be done here. You should activate the security question, but you can ignore the other options for now since OBS works with good defaults.
Stream
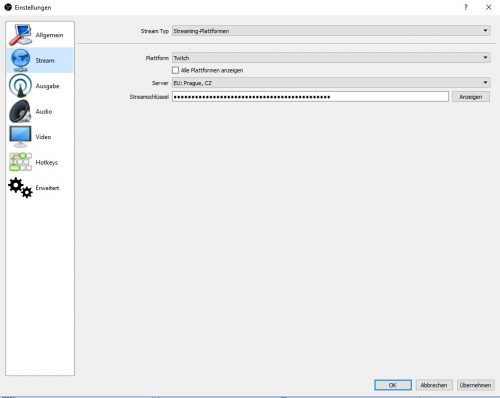
First select the platform of your choice from the list and then choose the closest possible server. Most of the time there are several servers that can be used, so you should test them and find out what works best for you. Besides that, you need your stream key for Twitch which you can find on Twitch on your Dashboard > Settings. You should copy it from your Twitch Dashboard and paste it in OBS on this page.
Note: Never pass on your stream key and change it immediately if you accidentally showed it to the public!
Output
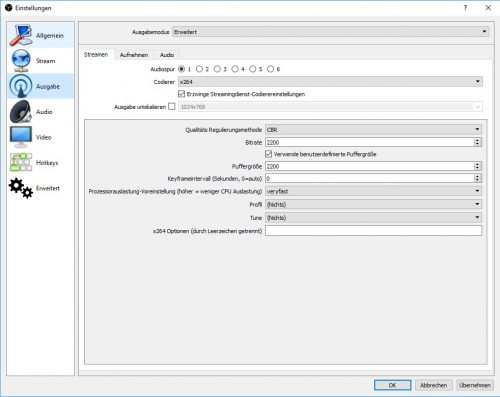
OBS supports different encoders if the corresponding technical requirements are met. However, since x264 encoding has the most stable performance anyway, it should not be changed.
For Twitch, CBR (Constant Bit Rate) should be selected as the rate control method. This function keeps the bitrate and therefore the quality, constant (If you are using a different platform and nothing else is explicitly recommended, you should use CBR there as well). The other quality options have no effect because the quality factor depends on the bitrate or the maximum bandwidth. If your internet connection is strong enough, you can choose up to 3500 in the bit rate box. Your Bitrate should never be more than 60% of your internet upload speed.
Please keep in mind, however, that your channel will not have “transcoding” options available in the beginning. This means that viewers can’t independently reduce the quality of the broadcast. This may prevent viewers with a slow internet connection from viewing your live stream if you have chosen a bitrate that is too high. Often a bitrate between 2200 and 2500 is recommended, which leads to a worse image quality of the stream. However, you can always change the bitrate during the stream, if viewers are having issues watching.
For the buffer size it is recommended to set the same value as you choose for “Bitrate”. However, the game itself usually needs some bandwidth, so a maximum of 60% of the total upload should be reserved for streaming.
In most cases, it is sufficient to keep the CPU pre-configuration at “very fast”, but if you have a CPU with enough power, you can also try out more powerful options here or reduce the utilization, if your CPU is not that new anymore. It’s important to note that “ultra fast” uses the least CPU power while going down towards “medium” uses more CPU.
Audio
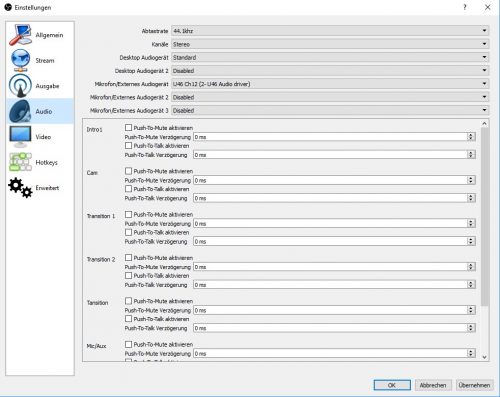
Here you can select your audio devices for the your stream, allowing you to perfectly match multiple output devices or microphones to each other. Separate push-to-talk or push-to-mute buttons can be defined for each device, including any desired delays.
You can also find mono and stereo sound configurations here. In most cases, however, you don’t need to change anything, as the audio devices are usually recognized and set up directly via your system’s default configuration.
Video
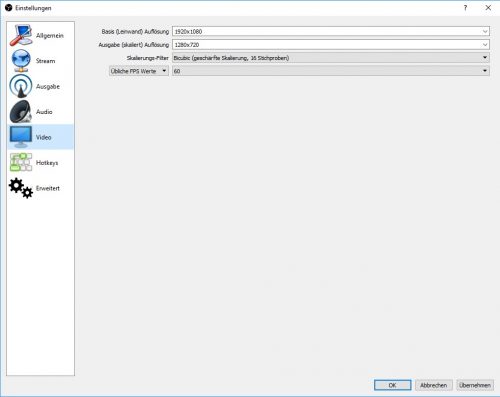
The base resolution should always be based on the resolution of your monitor or game (if you are not playing in full screen mode) to avoid annoying edges in the stream. In OBS Studio, however, there is a second setting that describes the resolution in which your game will be displayed in the stream. This means that the image will be downscaled, allowing OBS to save more resources and your broadcast will consume less bandwidth on both yours and your viewers side. Even among successful streamers there are many who still stream with a scaled resolution of “1280×720”, because it is considered to be more than sufficient.
With the scaling filter you can improve your streams quality a little bit – but in most cases “Bicubic” offers a good average value. However, if your computer and your internet connection are good enough, you can also try the “Lanczos” setting.
An FPS rate of 30 FPS is normally sufficient to achieve a high-quality stream and saves resources. Of course, a significant increase in quality is noticeable at 60 FPS, but by no means as extreme as the jump from 30 to 60 FPS within a game. The best thing to do is to try it out for yourself and get some feedback from your audience!
Note: We have skipped the “Hotkeys” section here, because it is not necessary for your first broadcasting session. You have to set the hotkeys at your own discretion to make it as easy and convenient as possible. If you want to learn about setting them up, here is a short video tutorial for you.
Advanced
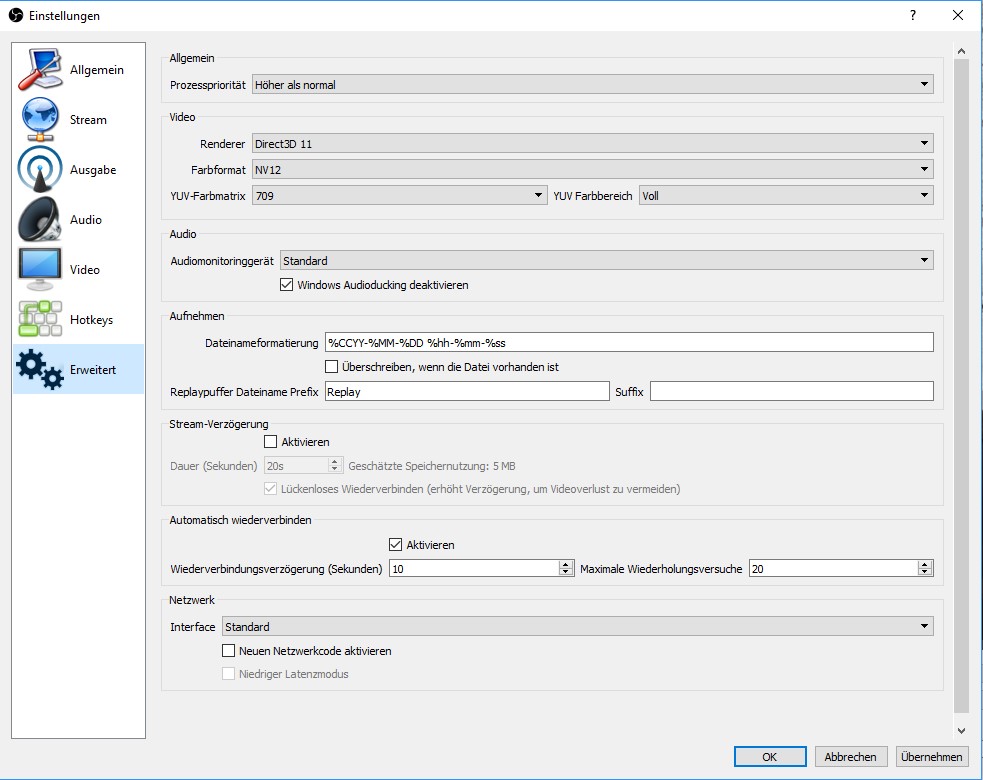
Open Broadcast Software is also perfect for YouTube. In the “Advanced” menu you can make some additional settings.
Auto-Reconnect can be useful if there are smaller connection interruptions, for example in WLAN.
OBS also offers the option of a stream delay, whereby the stream is broadcast delayed. This is especially useful if a live tournament is broadcast or if you want to protect yourself from other players watching the stream in order to gain an advantage (so-called “stream snipers”). However, since this is already offered by Twitch, this setting does not have to be made in OBS.
Note: If you stream with delay and the show ends, don’t close OBS immediately, otherwise the audience may not see the end! The program must remain open for the duration of the delay, even if the delay is set on Twitch.
Saving the stream as a file is always recommended to create highlight videos for YouTube or complete VODs. However, if you don’t want to overload your PC with countless files, you can do this directly via the video manager on Twitch.
With the replay buffer, a recent action can be saved and displayed as “Instant Replay” at the push of a button. Meanwhile you can also include your viewers interactively by using boom.tv. It allows viewers to create their own replays, which are then shown live in your stream.
Of course, for a good stream just connecting to Twitch isn’t enough.. There are a number of other configurations that need to be done for a professional look. These include the webcam, certain displays for donors and subscribers, a countdown, sponsors’ logos or simply the score of a current tournament series.
2 Free Twitch Overlays & Alerts by OWN3D Pro
Are you looking for free Twitch Overlays & Alerts for OBS? Then OWN3D.pro is the right place for you.
OWN3D Pro is an all-in-one solution for streamers and opens up a colorful world of high-quality designs and alerts for you as an OBS user. In addition to the free designs and alerts, you can switch between more than 200+ assets for a small monthly fee. This allows you to personalize your stream more than ever before and surprise your viewers with animated designs that match your mood, your chosen game or the current season.
3 Adding an overlay to OBS
An overlay upgrades your stream visually and makes a professional impression. In our shop you will find many different overlays for different games and design preferences. In addition, we have also written a tutorial for you which describes exactly how to add an overlay to your broadcast with OBS.
Adding an overlay manually
IMPORTANT: If you have bought an overlay and it is available as a PSD or JPG file, you have to convert it into a PNG with a transparent background first! You need ADOBE Photoshop to edit PSD files or convert them into PNG files. If you don’t have it, it would be best to get the PNG file directly from the manufacturer. All Twitch overlays you can buy in our Shop come with PSD and PNG files.
ADDING A NEW SCENE
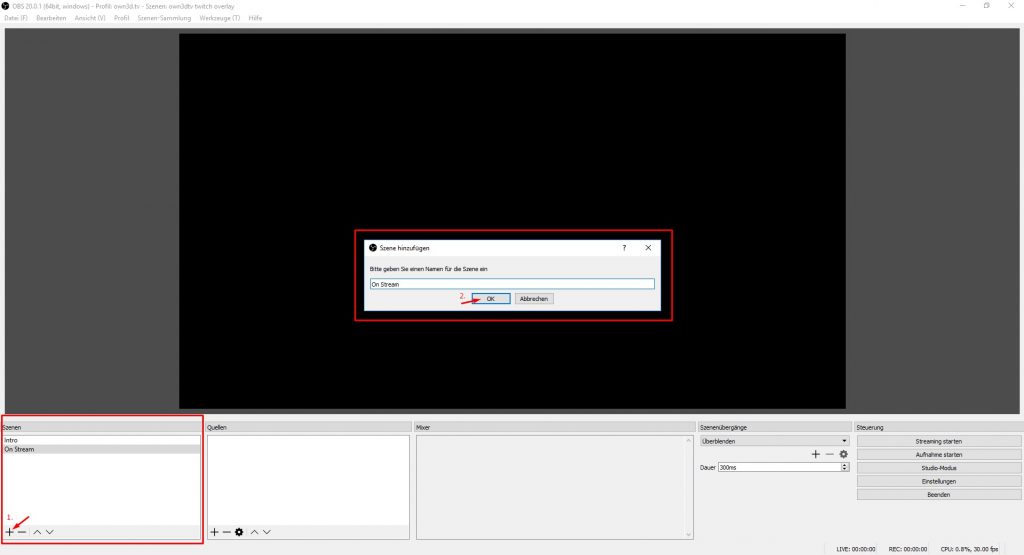
First you have to add a new scene in the “Scenes” column, where you can add the elements of your overlay later on. Just click on “+” to create and name the new scene. This column is helpful, because you can also define several scenes that you can jump back and forth with a mouse click or keyboard shortcut. Often, overlays have their own graphics for the live stream about to start, paused, or the stream ending, which you can define here as an individual scene.
Adding the overlay
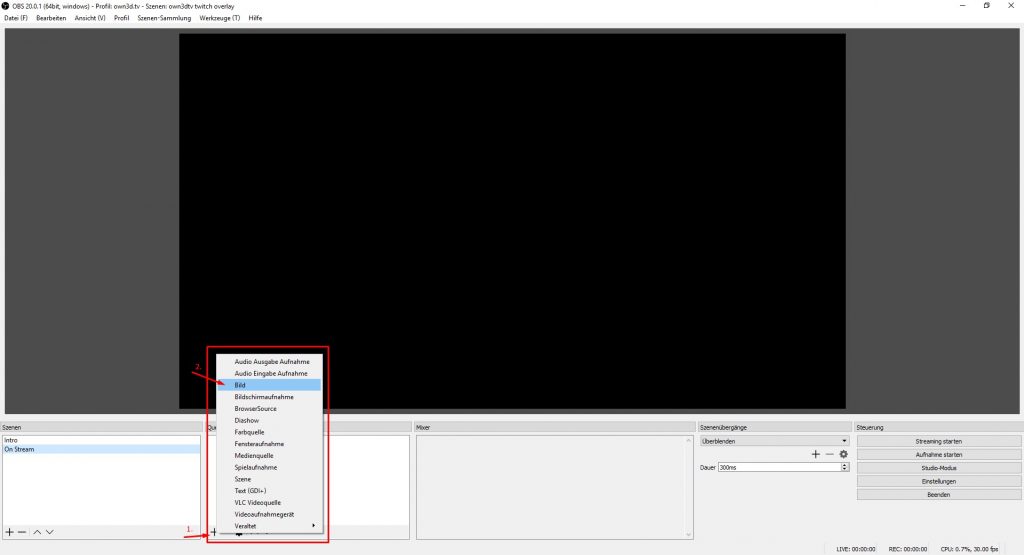
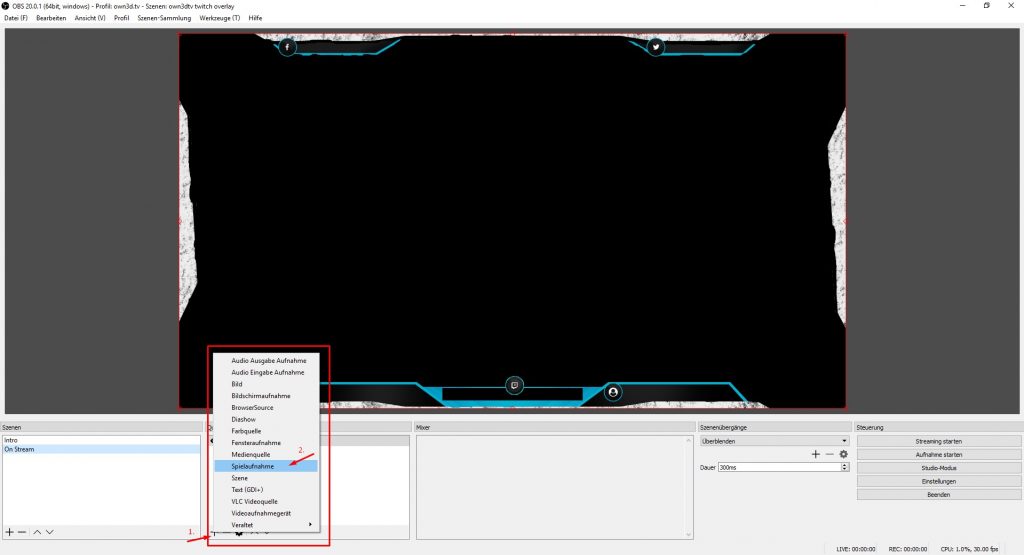
Now it’s time to fill your scene with the necessary sources. By clicking on “+” in the Sources box you will get a drop-down menu where you can add the respective elements to your scene. We will first add the desired overlay. To do that select “Image” in the menu.
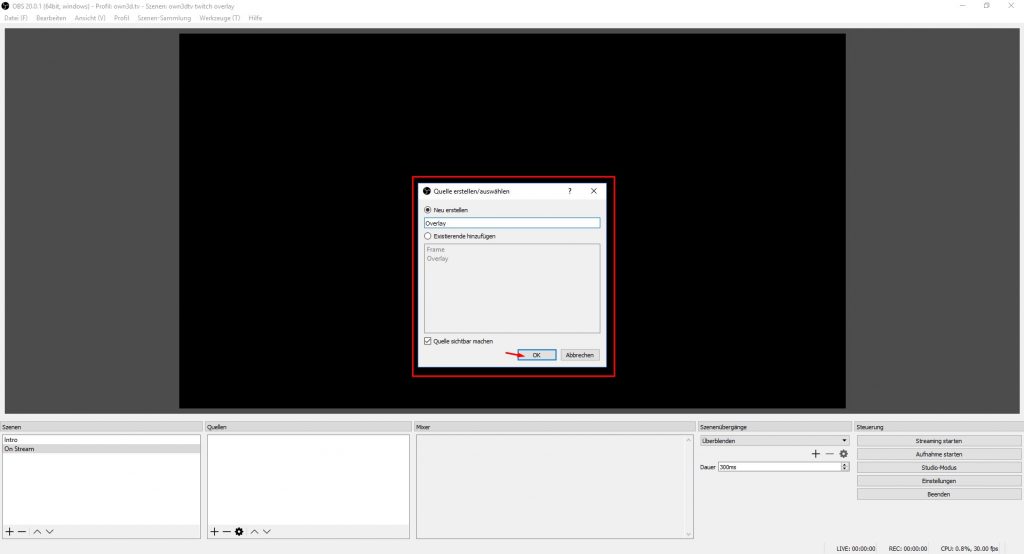
Whenever you add a new source, the following window appears. Here you can create and name a new source or add an existing one to your scene. That means, if you already use your webcam in another scene, you won’t have to add and set it up again, but you can transfer them directly from this list. Now name your new source (e. g. “Overlay”) and click OK.
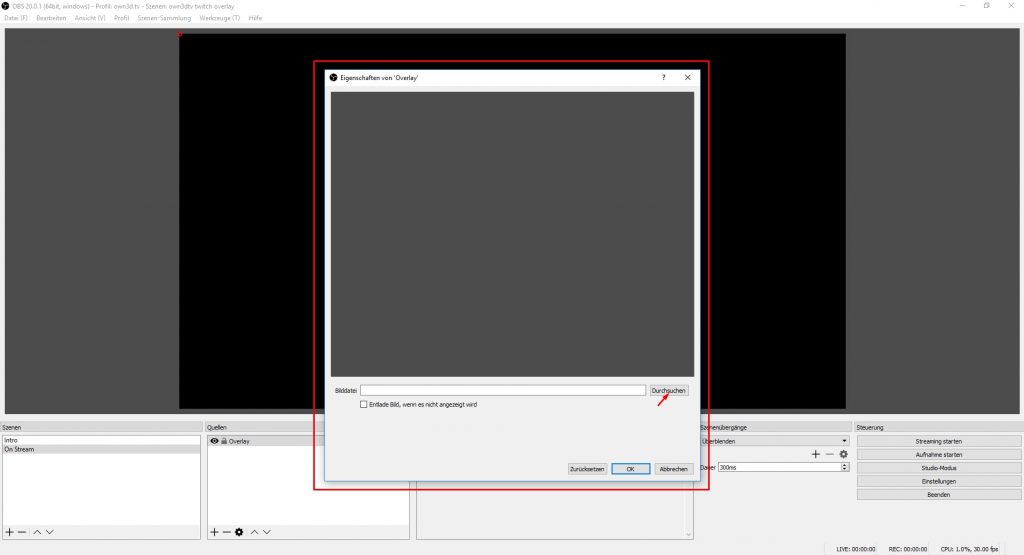
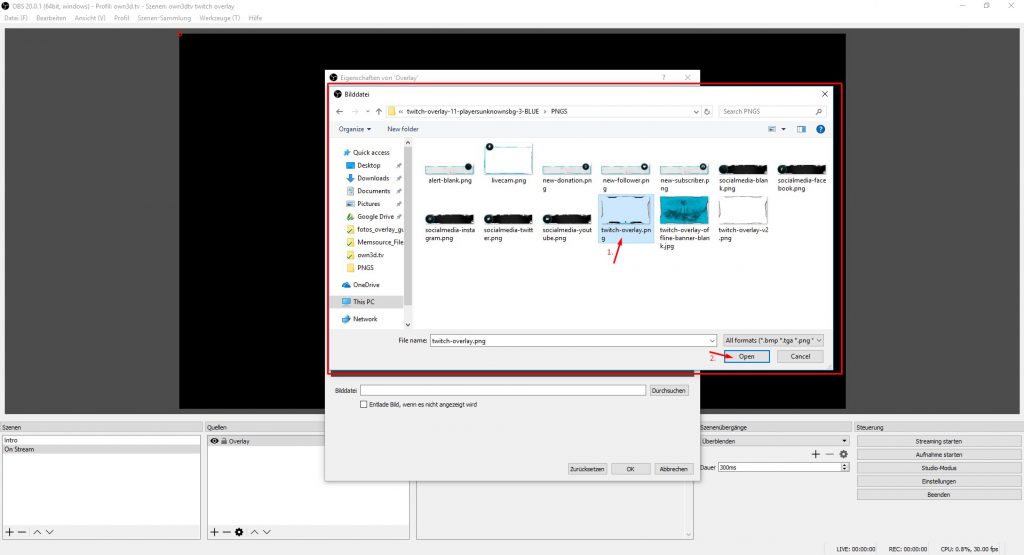
Now you will be taken to a new window in which you can add the image file to the OBS scene. Click on “Browse”, find the folder containing your overlay image file and select it. Click OK again and the overlay should now be part of your scene:
Tip: If you want to use a facecam with a suitable frame, simply repeat the steps above with the respective frame image file.
ADDING A GAME TO OBS
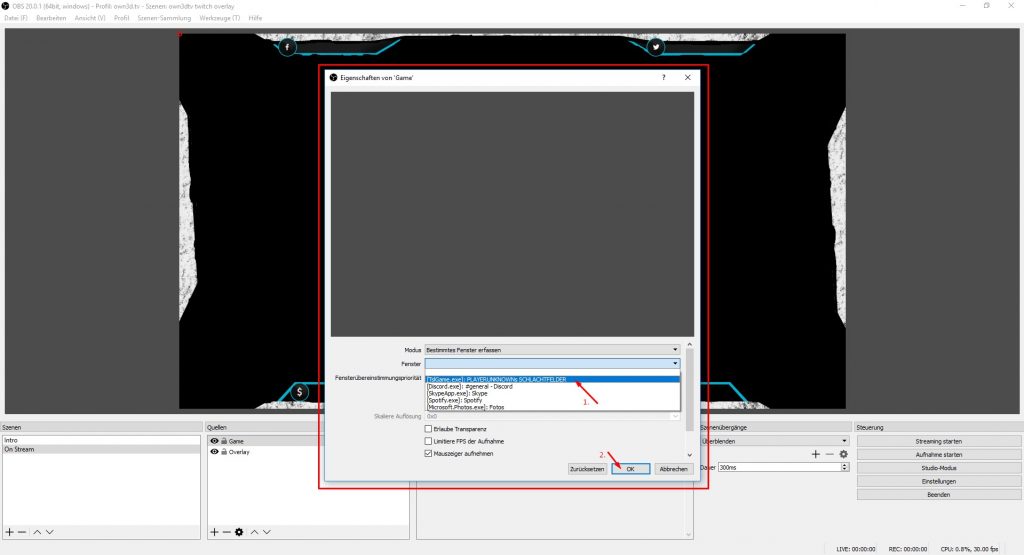
In the next step, you will be adding the game of your choice to OBS. Click on “+” again and then on “Game Capture”. Name the scene and then enter the settings window. Select “Capture specific window” in “Mode” there. Now you can select your desired game from “Window”. (Note, however, that this is only possible if the game is running.)
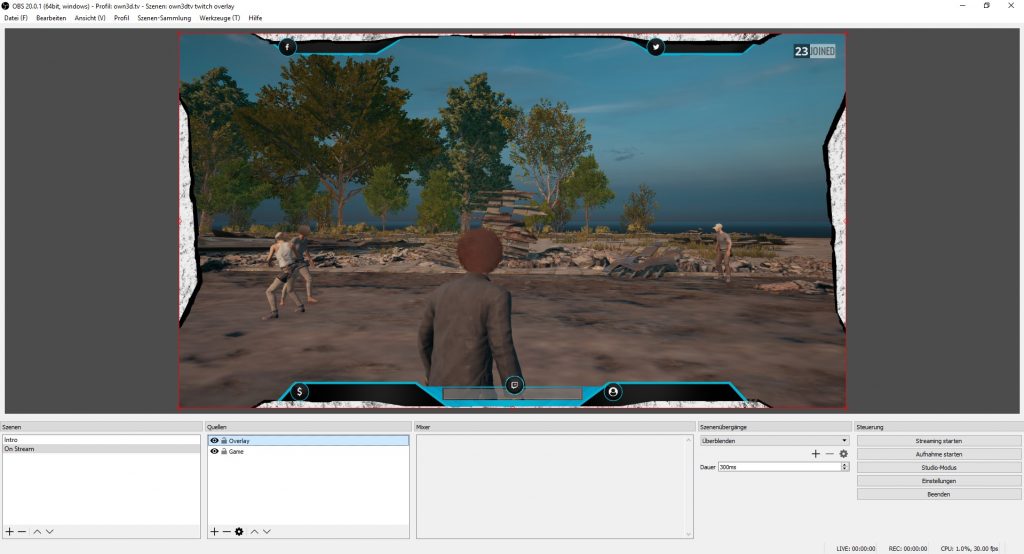
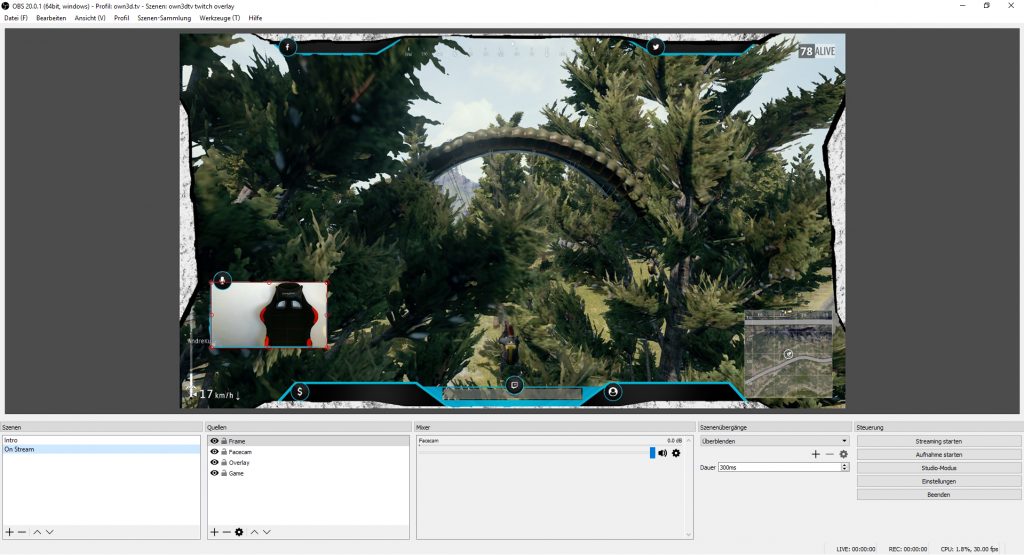
Make sure that the overlay is above the game recording in the sources order. If this is not the case, first click on the overlay in the Sources box and then on the upward facing arrow at the bottom of the box. If everything worked out, your OBS should look something like this:
ADDING A FACECAM
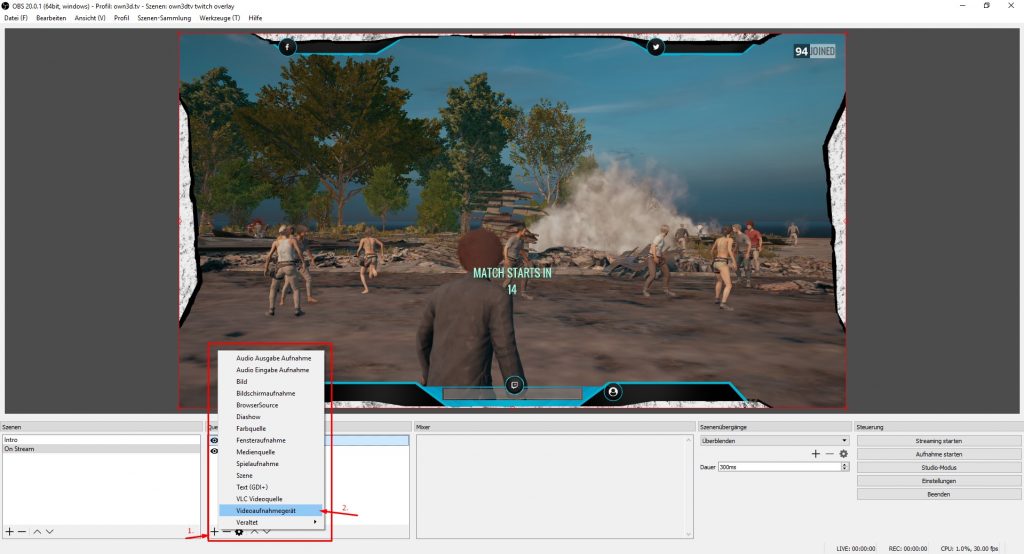
Now we are going to add a facecam. If you prefer to stream without a webcam, you can skip this. Click “+” in the Sources selection menu, and select “Video Capture Device” and click OK.
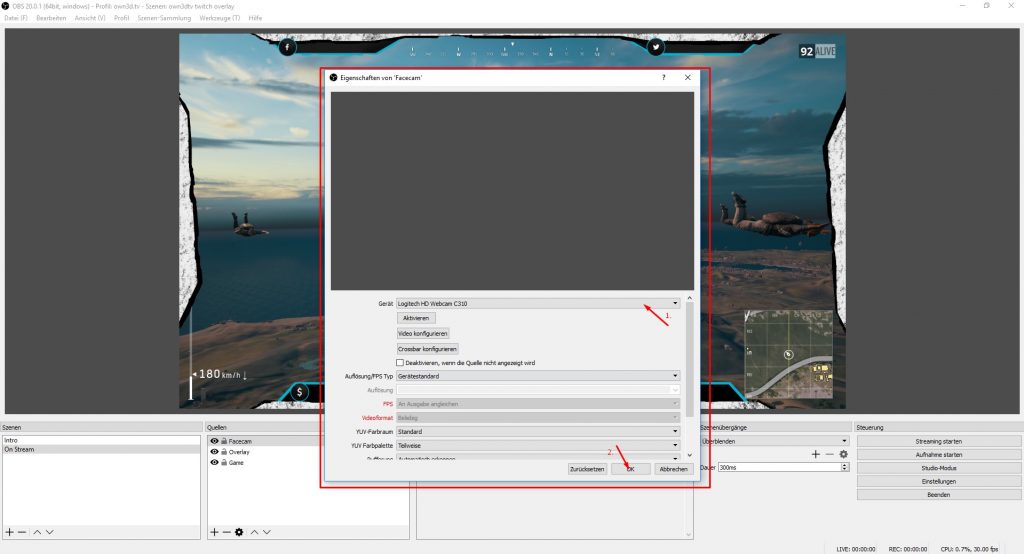
From “Device” you can now select your webcam. You can set FPS, resolution and other default options here. For a more detailed editing of the image, just click on “Configure video” and you will be taken directly to the configuration software of your webcam.
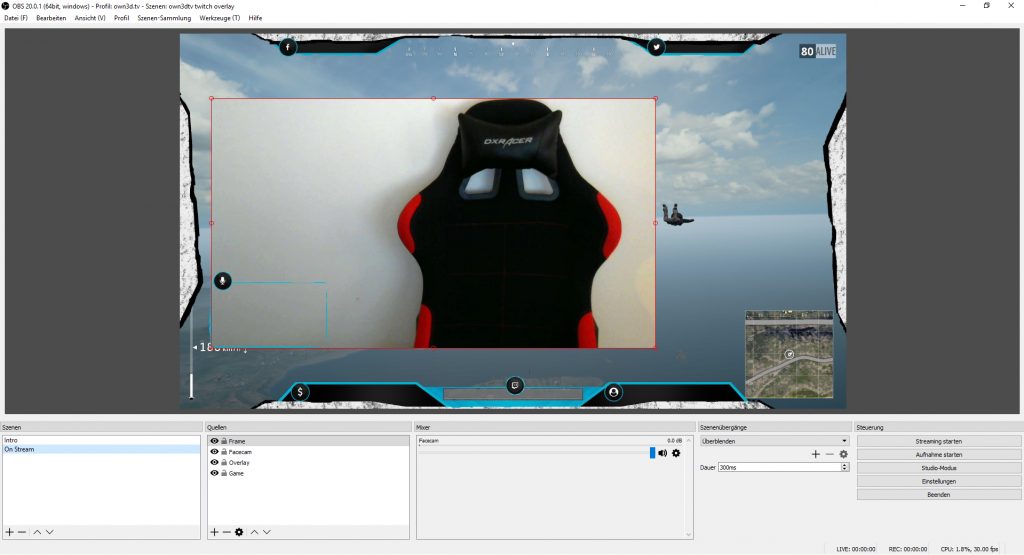
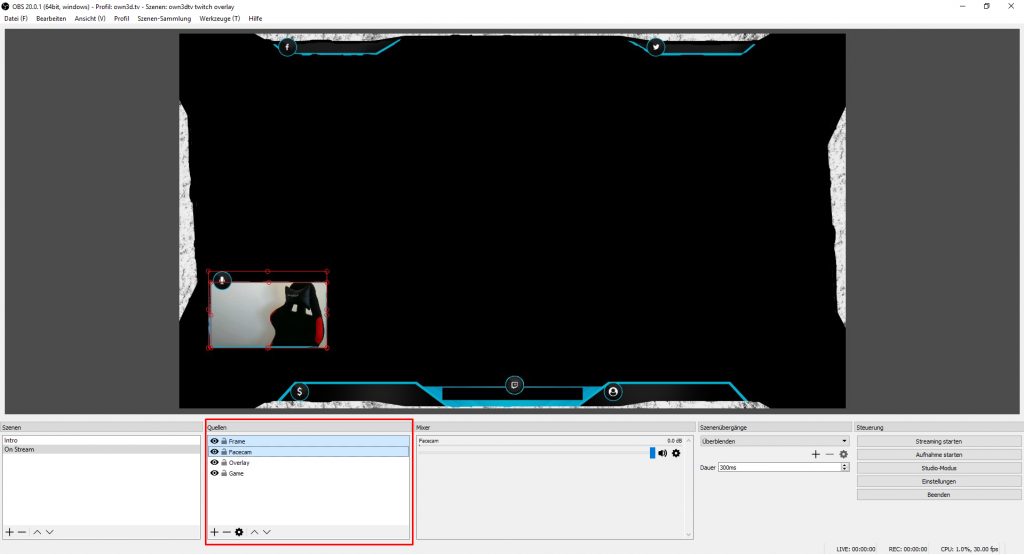
Now you have to adjust the size of the cam to fit your frame. To do this, simply select the webcam in the Sources box by left-clicking on it and then pull on one of the corners of the image. Click on the picture and hold down left-click if you want to move the picture a little.
Hint: As soon as you have adapted the cam to the frame, select the frame and cam in the Sources box by left-clicking on it while holding down the Ctrl key and then move them together within the scene.
After adding the cam and the frame, consider the sequence of the respective sources again and change them, if necessary, using the arrow keys. In the end, your Sources box should look like above.
Adding Donations, Followers, etc.
Since many overlays have the option to add information about donations, followers etc. to the stream, you can choose to display this information in your broadcast.
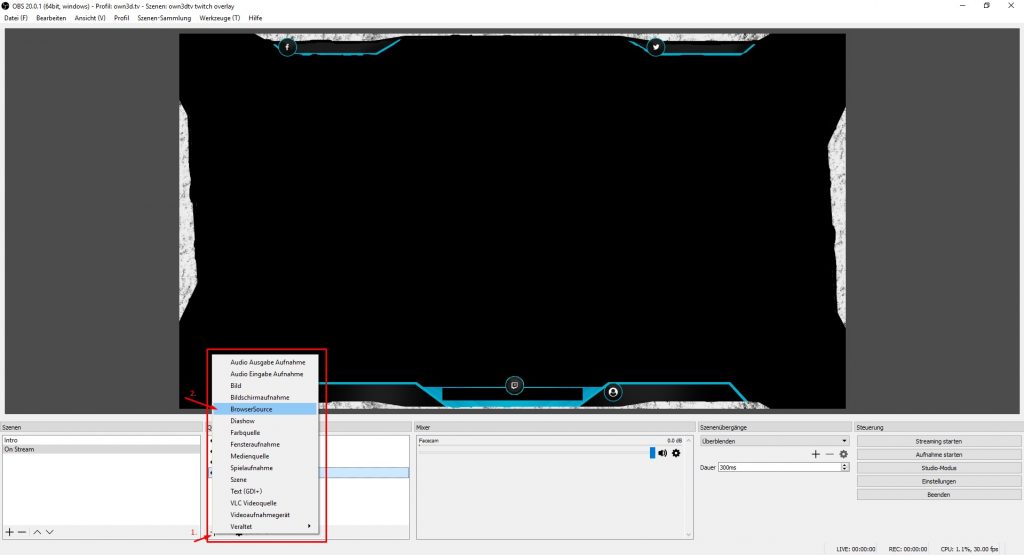
This time you choose “BrowserSource” from the source selection and give this source a name (e. g.”Latest follower”).
Depending on the provider, there are different ways to add the desired information to the stream. There is, for example, the possibility to define follows, subscribers and donations as single sources and display them at different points of the overlay. You can also generate an “event list”, which shows the last four events.
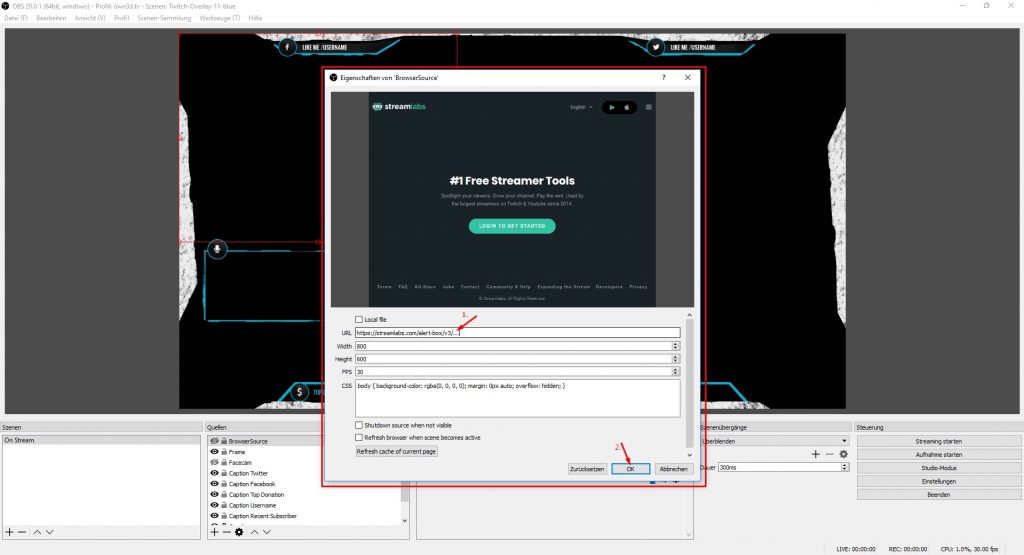
An example for a popular service would be Streamlabs. All you have to do is connect your Twitch account on streamlabs.com and you can edit the display of your respective stream information immediately. Then you can generate a link that you simply add via the BrowserSource window. Just insert the link as below in the “URL” box. If necessary adjust the height and width and then click “OK”.
As with any other source, you can change the placement and size directly in the scene. Many overlays, as for example our templates, include individual .PNG files to highlight latests followers, recent donations etc.. As described above, all of these elements can be added to your scene via the “Image” section.
4 Importing a complete scene in OBS
All overlays from our shop include an import script for OBS, so you can start streaming quickly after these few steps:
-
Install all fonts from the folder /fonts on your system.
-
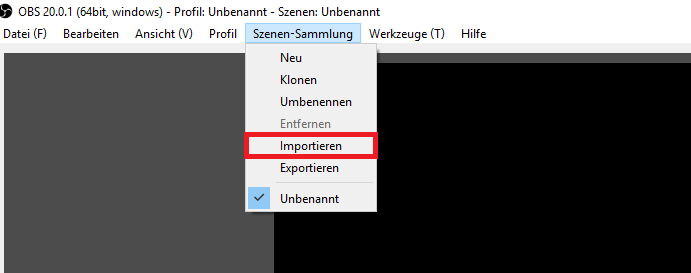
Import the scene.
-
Set up the imported scene elements.
Select all fonts from the /fonts folder and then click (right-click) on Install in the context menu.
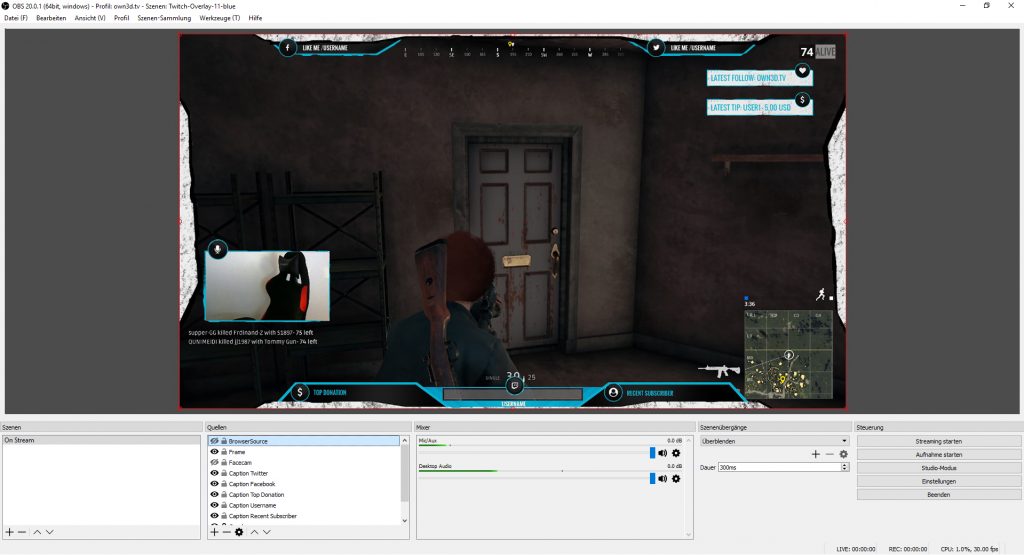
We provide you with a complete set of scenes so you can start your Twitch stream quickly and easily. Simply select the included file from the download directory. Now you have successfully imported the set of scenes and you can continue editing. In the Sources box you will find the following elements:
Overlay layer
Double-click on the layer “Overlay” and select the correct path to your overlay.png file.
Text elements
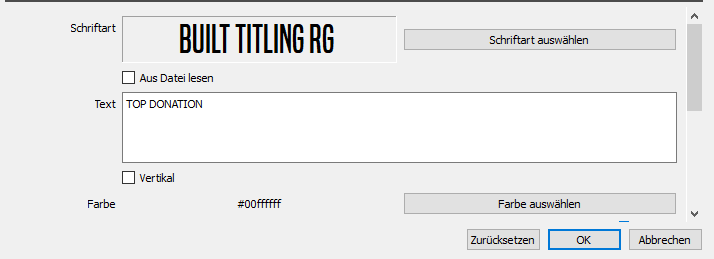
With a double-click on a text element you can modify the text. In this way, you can customize all the necessary text according to your what you want.
Camera source
Double-click to select the correct camera. The alignment is already optimally positioned for you.
Note: All of our templates have been tested with the latest OBS version. In principle, downward compatibility should be guaranteed. If there is a problem, make sure you are using the latest version of OBS.
5 Alerts
Many large channels on Twitch use alerts to show viewer actions such as donations or follows. Usually a funny animation or a special sound is played. We recommend streamlabs.com for this purpose. There you can also log in with your Twitch account.
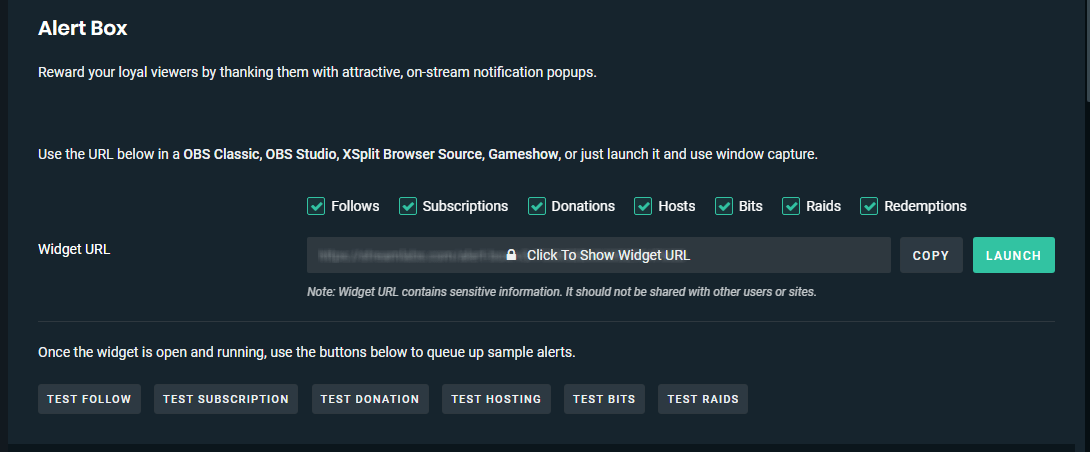
In the dashboard at Widgets->Alertbox you will find all settings for your alerts. Let’s take a look at it:
WIDGET URL
This is the URL, which you have to enter as browser source in OBS later on. Don’t make this URL public, as other people could add your alerts to their own stream on Twitch.
GENERAL SETTINGS
In General Settings you can modify some default values, such as the alignment of the image, text of the alerts, the font color or default values for delays.
FOLLOWS, SUBSCRIPTIONS, DONATIONS, ETC.
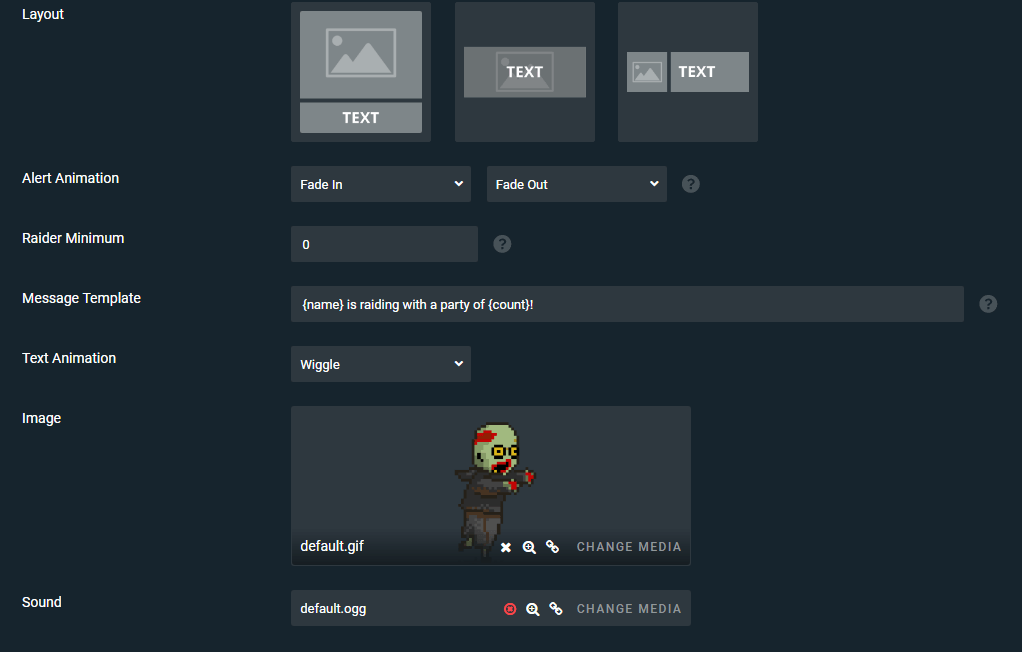
All other tabs are reserved for detailed settings of the individual alerts. You can activate and deactivate each alert individually, overwrite the default settings and type in an alert message. You can customize them easily:
-
{name}: Replaced by the donor’s name, followers, etc.
-
{amount}: The amount donated, both for donations and for cheers with bits.
Here you can also set up the image, sound, and animation of the alert. The alert variations are also particularly useful. You can find them at the bottom of the settings pages. Here you can create alternative alerts for the same viewer action, which will be randomly displayed instead of the normal message. The best thing to do is just to try it out, as most of the settings are self-explanatory.
Important: After editing, always click on Save Settings first so that the settings you have made are not lost.
When you have finished setting up everything, copy the widget URL to the browser source in OBS. Test your alerts by clicking on the different test buttons below the widget URL (OBS must be active).
6 Expanding OBS
The power of the OBS plugins - On the resources page in the OBS forum you will find a number of useful plugins and extensions for OBS Classic and OBS Studio. These include automatic scene changes, various filters, extensions for the Twitch chat and many other interesting features.



Comments
0 comments
Article is closed for comments.